In this series I’m going to go over creating a Javascript program that iterates over JSON to tell an interactive story. Here’s an example:
If you think that’s pretty neat, well hey, why not follow along with this tutorial. I’m going to go over:
- How an interactive story works on a conceptual level, so you can take that knowledge to any programming language and implement it yourself
- How we can use JSON to store information about our story
- The actually implementation behind the example you see above
When we’re done you’ll have some code you could embed in your page to tell any story you like! So, let’s start with the basics…
How does an interactive story work?
Before we even write a line of code it’s important to consider what we’re actually trying to do. Take a look at this very simple outline for a dialogue:
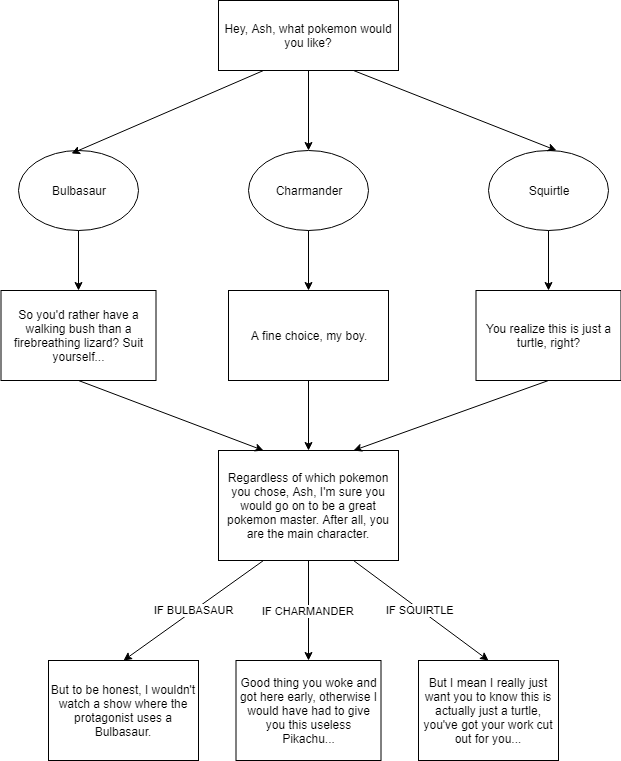
Squares represent dialogue and circles represent a choice for the player presented as a button
So, what does this do? The player is presented with 3 choices of pokemon, and depending on which one they pick, they get a different response, which then all collapse back into the same dialogue. After that the speaker throws out a differnent quip depending on which choice the player made. Just looking at the diagram you can get an idea of how we might want to model this problem; each piece of dialogue should be held in its own individual node, and we should be able to progress through the conversation by shifting from one node to the next; it would be silly if we had 3 different instances of the “Regardless of which pokemon…” dialogue stored for each of those nodes to transition to!
Now let’s talk about how those nodes shift from one to the next. If we look at the diagram, the very first dialogue we are presented with offers up 3 choices, which give us a different response depending on what we choose. After that we see that we transition from one section to the next with no input from the player to the “Regardless of which pokemon” text. Finally we transition again, also with no input from the player, but this time we are doing something different based on the choice the player made earlier. So let’s get more specific about the functionality we need. A node:
- Has dialogue
- Can store information about the next node it will transition to
- Can store the text on the button for the transition when there are no choices
- Can store multiple transitions that vary based on choices / variables that were set earlier
- Can store choices
And speaking of choices, given the example, we can assume that a choice at least needs to:
- Store the text of the choice (charmander, bulbasuar, squirtle)
- store a reference to the node it will transition to
- Be able to set internal variables somehow
So what we are trying to do is figure out how we can store all this information as data in a file, and then write a program that can use that data to produce the functionality we want, in this case display texts and buttons to bring the player through the conversation. As mentioned earlier this tutorial is about using JSON to accomplish this task, but you can use other data formats, another common one being XML.
Here’s how we’re going to be modeling those concepts in JSON:
{
    // These represent the variables that can be stored by choices in the story.
    "variables": {
        "this_is_a_variable": "value",
        "helpful": false
    },
    // This references the first node of the dialogue. We could also choose to make a convention
    // Where the first node is named something like first or start. I've just chosen to do it this way.
    "start": "first",
    // This is where each individual piece of dialogue is stored, and its choices and redirects are stored.
    "nodes": {
        "first": {
            "data": {
                "text": "This is the example! What do you think?"
            },
            "choices": [
                // Each individual choice will have information about its text, the condition(s) it sets,
                // And the node that it redirects you to when clicked
                {
                    "text": "Not very helpful",
                    // Set conditions is how we will have choice set the variables defined at the top
                    "set_conditions": [
                        {
                            "variable": "helpful",
                            "operator": "=",
                            "value": false
                        }
                    ],
                    // If you're confused why we're storing our redirect in an array, don't worry,
                    // we'll get there!
                    "redirects": [
                        {
                            "node_name": "second"
                        }
                    ]
                },
                {
                    "text": "Extremely helpful!",
                    "set_conditions": [
                        {
                            "variable": "helpful",
                            "operator": "=",
                            "value": true
                        }
                    ],
                    "redirects": [
                        {
                            "node_name": "second"
                        }
                    ]
                }
            ]
        },
        "second": {
            "data": {
                "text": "This is the second thing I say. After this, I'm going to say something different depending on whether you picked helpful or unhelpful.",
                "response_text": "OK that makes sense"
            },
            "redirects": [
                {
                    "node_name": "was_helpful",
                    // Conditions are how we can take a different path based on what the user
                    // Chose earlier
                    "conditions": [
                        {
                            "variable": "helpful",
                            // The operator allows us to do different kind of condition checks; eventually we'll work in
                            // numeric operators as well!
                            "operator": "=",
                            "value": true
                        }
                    ]
                },
                {
                    "node_name": "was_not_helpful",
                    "conditions": [
                        {
                            "variable": "helpful",
                            "operator": "!=",
                            // To be fair, we could also choose to use equals again with true; I just want to show
                            // We'll be defining multiple operators.
                            "value": true
                        }

                    ]
                }
            ]
        },
        "was_helpful": {
            "data": {
                "text": "I'm glad you felt that way!"
            }
        },
        "was_not_helpful": {
            "data": {
                "text": "Dang! Mind telling me how I can do better in the comments?"
            }
        }
    }
}
You can take a look at the JSON for the intro example and the pokemon example here and here.
Take a look and see if you can tell how the heirarchy of the data fits with what we described earlier. If you look at this and you feel like you have an idea of how you would implement this yourself using this data, why not take a stab at it? If you get stuck you can always refer back to the later sections for inspiration. If you look at this and you have no idea what first step you would take, then that is more than fine, because you are who the rest of these tutorials are made for! In the next section we’ll be setting up the GUI so we can display our dialogue and buttons, and writing the code to process nodes that simply redirect from one to then next; after that we’ll move on to adding choices, and then variables and conditions.